2026 How to Use Clear Silicone Sealant for Best Results?
Using Clear Silicone Sealant effectively can transform your projects. This versatile product is ideal for sealing, bonding, and waterproofing. Whether you're repairing a leaky sink or installing a shower, its applications are endless.
However, achieving the best results requires more than just application. It's essential to prepare your surfaces properly. Clean them thoroughly to ensure a strong bond. Many users underestimate this step, leading to failures. This guide will help you identify common mistakes and highlight essential techniques for success.
Clear Silicone Sealant is durable and flexible, but it can be tricky to work with. You'll learn tips on how to apply it neatly and efficiently. Mistakes happen; even seasoned professionals can struggle. Understanding these challenges will elevate your skills and ensure long-lasting results.
Understanding Clear Silicone Sealant and Its Applications
Clear silicone sealant is a versatile material widely used in various applications. Its strong adhesive properties make it ideal for sealing gaps and joints in different surfaces. This sealant can withstand extreme temperatures and humidity, making it suitable for both indoor and outdoor uses. Whether you’re sealing windows, doors, or even aquariums, clear silicone serves multiple purposes.
Understanding its application processes is essential for optimal results. Clean the surfaces thoroughly before applying. This step prevents adhesion issues and ensures a strong bond. Applying the sealant evenly can be challenging. A consistent bead is crucial for effective sealing, but it's easy to make mistakes. Using a caulking gun can help achieve better precision. After application, let the sealant cure properly. Though it may seem tempting to speed up the process, patience is key for durability.
Many overlook the importance of testing small areas first. Conditions like temperature and humidity can affect results. If the sealant fails, you may need to start over, which can be frustrating. Learning from these experiences improves future projects. Evaluating your technique after each use contributes to your skills.
Choosing the Right Type of Clear Silicone Sealant for Your Project
Choosing the right type of clear silicone sealant is crucial for successful application. Various types of clear silicone are available, each designed for specific purposes. For example, some types are formulated for high-temperature resistance, while others excel in moisture protection. Understanding your project's unique requirements can guide you in making the best choice.
Consider where you will use the sealant. Areas exposed to water, like bathrooms or kitchens, require a sealant with mold resistance. On the other hand, outdoor projects may need silicone that withstands UV light. Look for products that clearly state their intended use. This ensures reliability in challenging conditions.
It's important to note that not all clear silicone sealants adhere well to all surfaces. Testing a small area before full application can prevent future headaches. Mistakes can happen if you rush this step. Failing to assess surface compatibility might lead to peeling or separation over time. Reflect on these details and choose wisely for optimal results.
Preparing the Surface for Optimal Sealant Adhesion
Preparing the surface for optimal sealant adhesion is crucial for effective sealing. Start by cleaning the area to remove dirt, dust, and grease. Use a suitable cleaner and a scrub brush for stubborn stains. Rinse the surface with water and let it dry completely. A clean surface allows the sealant to bond properly.
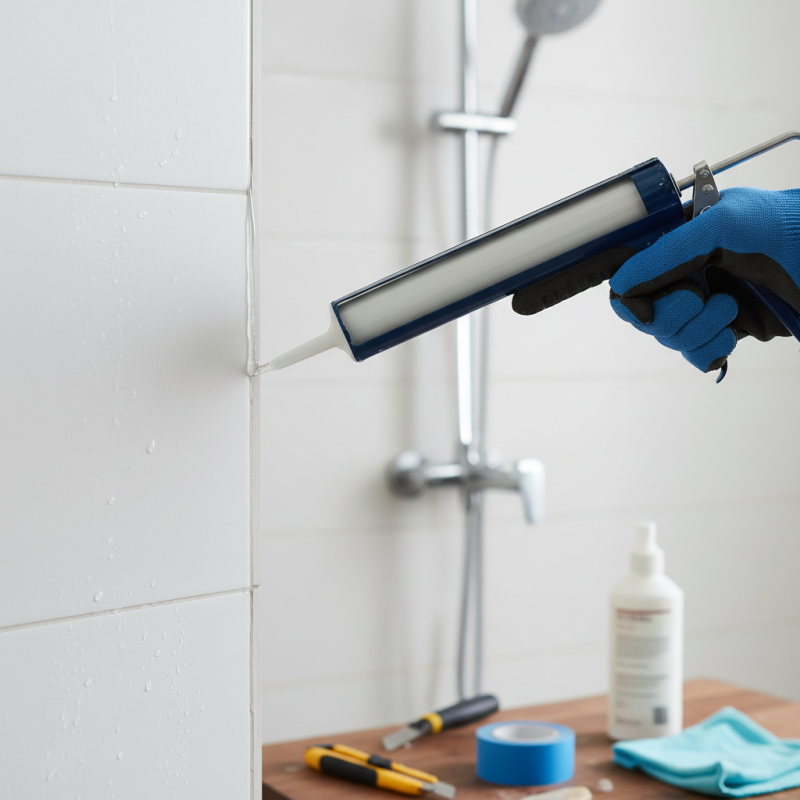
Next, inspect the surface for any cracks or damages. Repair any issues before applying silicone sealant. Use a caulk gun to apply the sealant evenly. Pay attention to corners and joints, as these areas often require more material. Ensure that the application is smooth to prevent air bubbles. After application, smooth the sealant with a finger or a spatula.
Take your time during this process to achieve the best results. If the sealant fails to adhere, it may lead to leaks or mold growth. Reflect on what could have been done better. Proper preparation can significantly extend the life of the sealant. Remember, attention to detail makes a difference.
Step-by-Step Guide to Applying Clear Silicone Sealant Effectively
Applying clear silicone sealant can effectively prevent water damage and improve energy efficiency in any home. Following a step-by-step approach ensures optimal performance. Start by preparing the surface. Clean it thoroughly to remove dust and debris. This enhances adhesion and ensures longevity. According to industry studies, surfaces treated this way hold sealants up to 30% better.
Once the area is prepped, cut the nozzle of the silicone tube at a 45-degree angle. This allows for better control and a smoother bead. Apply the sealant steadily, pressing it into the joint. Use a caulking tool or your finger to smooth it out. This compresses the sealant into the joint and eliminates air bubbles, which can cause gaps later. Research shows that these techniques can extend the lifespan of the sealant by over 40%.
Tips: Before sealing, always test the silicone on a small area. This can help you understand the drying time and finish. Keep in mind that even slight humidity or temperature changes can affect curing. Allow the sealant to cure fully before exposing it to water. Inadequate curing can lead to mildew and shorter lifespan. Always reflect on the process after you finish. Analyze what worked and what didn’t. Continuous improvement leads to better results each time.
2026 How to Use Clear Silicone Sealant for Best Results
| Step | Description | Tips |
| 1 | Prepare the surface by cleaning it thoroughly. | Use isopropyl alcohol for better cleaning. |
| 2 | Cut the nozzle of the silicone tube at an angle. | Choose a nozzle size that fits the gap you're sealing. |
| 3 | Apply the silicone sealant in a steady motion. | Keep a consistent angle and speed for an even bead. |
| 4 | Smooth the sealant with a tool or your finger. | Use a wet finger for a cleaner finish. |
| 5 | Allow the sealant to cure as per manufacturer instructions. | Curing time may vary, so check product guidelines. |
Tips for Maintaining and Cleaning Silicone Sealant after Application
When applying clear silicone sealant, it’s essential to focus on maintenance and cleaning for longevity. Proper care can extend the lifespan of your sealant by up to 30%, according to industry studies. The first step is to avoid harsh chemicals for cleaning. Instead, warm soapy water and a soft cloth can effectively remove dirt without damaging the silicone.
For maintenance, inspect your sealant regularly. Look for any signs of wear or discoloration. A sealant that is cracking or peeling may need attention. Reapplication may be necessary if the sealant loses its adhesion. Reports indicate that 20% of sealants fail due to poor maintenance practices. Neglecting these checks can lead to moisture damage and costly repairs later.
After cleaning, it’s important to let the area dry completely before applying new sealant. This can take several hours in humid conditions. Some choose to use sealants in high-moisture areas but fail to ensure proper drying. Remember, a well-maintained sealant not only improves aesthetics but also enhances functionality. The reflection of care and attention in these small details can impact the overall durability of your treatment considerably.